If you’re thinking about turning that manuscript into a Kindle file and starting on your own path to indie authorship, you’re likely to find it a pretty easy process–but maybe with one exception. Your Kindle file is going to need an active Table of Contents so users can go to the different chapters in your book with ease simply by clicking on an entry in your Table of Contents. Having a poorly structured Table of Contents may affect your book’s availability, and it can also lessen your reader’s enjoyment of the book. Poor formatting or other marks of unprofessionalism are among the biggest complaints about indie e-books.
Setting up your Table of Contents (TOC) shouldn’t be an issue, but if you’ve never done it before and look to the Help page on Amazon for guidance, you’re probably in for a frustrating time. The instructions are vague and assume a lot of prior knowledge. Amazon and other companies offer conversion services, but getting your files ready is something most people should be able to do on their own. Creating the active TOC is really not that difficult, but there are a few steps involved that I’ll lay out for you below.
I’m using Word for Mac for these screenshots. Using Word for a PC is basically the same process; it just looks like a little different. If you’re not using Word…well, use Word, okay?
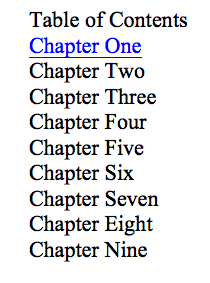
First of all, don’t bother with Word’s Table of Contents generator. It involves following several more steps using Styles. If you’re going to format for Smashwords, that’s something you’re going to need to do, but let’s leave that for another time. Instead of letting Word generate a TOC for you, just insert a page break where you want the TOC to go and type “Table of Contents” at the top of the page. Follow that by typing out the names of your chapters. Let’s say you have nine chapters, numbered only with no chapter names. Your TOC will start off looking like this:
If you have chapter names instead of numbers, type them out the same way. However you’re identifying chapters, just type up a list.
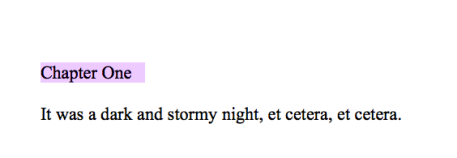
Next, go to the actual first page of the first chapter and highlight the chapter title
To create the active TOC, you’ll need to bookmark the destination that you want the TOC entry to take the reader to. So, with the chapter name highlighted, go into your Insert menu and select “Bookmark”:
You’ll now be taken to a new screen that will ask you to name the bookmark. Technically, you can name it anything you want, but for ease of use I’d recommend naming it the same as your chapter title. Remember that you can’t use spaces in bookmark names, though, so if you want a space, use the underscore as I’ve done here:
Once you’ve given the bookmark a name, click “Add” and you’re ready for the next step. Go back to the Table of Contents you typed up earlier and highlight Chapter One, or whatever other name you’ve given to the chapter you just bookmarked.  With that entry highlighted, go back to the “Insert” menu and select “Hyperlink.”
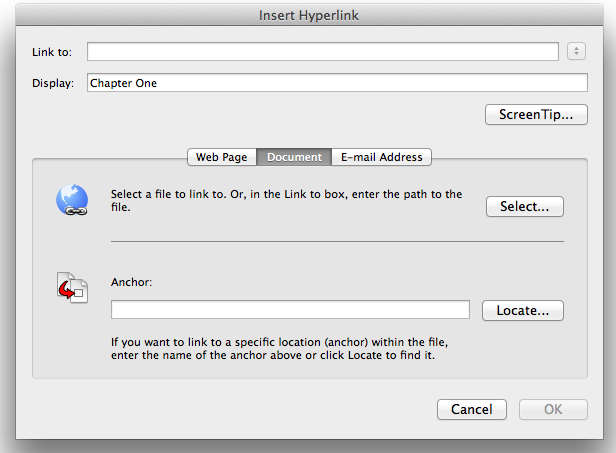
You’re now going to create a hyperlink between the item you just highlighted and the one you bookmarked earlier. When you click “Hyperlink” you’ll get this screen:
Select the option for “Document” in the center of the screen. You’re doing this because you’re linking things within the document itself as opposed to linking to something outside the document, on the web, or elsewhere. You’re going to “Anchor” the hyperlink to something in the document, so click on “Locate” to get this screen:
You’ll need to click on the “Bookmarks” arrow to get a list of bookmarks in this document, and there should be one for the first chapter that you created earlier. Select and click “Okay.” The bookmark you selected should now appear in the “Anchor” window:
Again, hit “Okay” and you’re done. Now the “Chapter One” entry in the TOC appears as a hyperlink. If you click it, you should be sent to the bookmarked location, which should be the beginning of the chapter.
You don’t have to follow this next step, but I think it’s a nice touch. Here, you’ll create a bookmark for the Table of Contents itself and hyperlink it to the beginnings of each chapter. This way, readers can click on a chapter title in the middle of your book and be taken directly back to the TOC to be able to go to a different chapter easily. Start on the TOC page itself and highlight the words “Table of Contents.” Then repeat the earlier step to bookmark the TOC. In the field where you name the bookmark, just enter “TOC.”
Click “Add” and then go to the beginning of Chapter One. Select the name of that chapter and Insert a hyperlink as you did before. Now, though, you’re going to link to the “TOC” bookmark.
Click “Okay” and then “Okay” again on the Insert Hyperlink page, and your chapter heading is now a hyperlink that takes readers back to the TOC page.
Repeat the above processes for all of your chapters and be sure to add hyperlinks and bookmarks for your Acknowledgments and About the Author pages and anything else you want in the TOC.
It’s a bit tedious if you have a lot of chapters, but once you get going it won’t take long. When you’re finished all the entries in your TOC now appear as hyperlinks and you should be able to click on all of them to be taken to the different parts of your book. You can then click on chapter names and be taken back to the TOC.
I hope you’ve found this helpful.
This is absolutely brilliant! I had been scouring the Internet for just this information. Exactly what I needed. Thank you so much for making what seemed so difficult from some articles, so easy to follow. Thanks again! Hope to have my book published on Kindle tonight!
So glad to hear the article was helpful. Best of luck with your book.
Hi. Unfortunately the links worked within word for mac 2011 but did not when looking via kindle viewer, It also said i had not included a table of contents.
Hmmm. You might have a look at FAQs. As I recall, the links didn’t work when viewed through the website. If you download the file to your kindle, it may work there regardless, which means all is good. Still, troubling that the you’re getting the error message. All I can suggest is try it again, and make sure you’re not using Word’s TOC generator. You have to do it manually.
A sigh of relief emerged from my lips as I found this page. Thank you thank you thank you!
GOD BLESS YOU! I was struggling with this, as I was using the Word-generated TOC and getting an inactive chapter listing on my kindle book. Thanks for the much-needed step-by-step.
Glad to be of service. Good luck with your book.
Thank you. Thank you. Thank you! I’d still be trying to sort this out if I hadn’t found your post! My book, Lessons in Sustainable Happiness, has just gone live! KDP should hire you to rewrite their instructions!
You’re most welcome. Glad to be of service. Best of luck with the book.
You are awesome.
Glad I could help.
You made this so easy! Thanks so much, Richard.
Glad to be of help.
You are a livesaver!! Couldn’t find this information, all of it spot on, as though you knew that writers were baffled. Wish all manuals were written like this!
Glad to be of service.
Thanks Richard, my previous attempts at understanding how to add a ToC to my Kindle books have been impressive failures. NOW I get it. You have saved me many more hours of head scratching, strong coffee and blue air. Long winded it may be, but I no longer consider it a dark art. Thanks again
Glad to be of service. Best of look with your project.
Hi there, just wanted to say, I liked this post. It was helpful.
Keep on posting!
Thank you! I have been struggling to figure out how to do this. I could find stuff for Word, but not Word for Mac which is different. Just getting started with KDP and your detailed, step-by-step instructions have helped tremendously!
I’m glad I was able to help. Good luck with your book.
Finally a helpful post!! After days of painting myself into a corner your post was exactly what I needed. Thanks so much!
Glad to be of help. Best of luck with your book.
Thanks so much for that clear run through. Amazon is less than helpful, and if you’re using Mac (as I am), often no use at all.
Happy to have helped. Best of luck with your book.
Great post. Followed it to the letter and created a fine looking TOC that works perfectly on my word doc and also when I converted it to a web page. But once I uploaded the file to amazon, it failed to work and I can’t figure out why. Any suggestions? Thanks.
Unfortunately, I have no idea. I know Amazon’s help section is useless on this. Is it failing to work when you check in their Kindle app on the upload page? That might be the problem. I recall seeing something about the TOC not working from that app–might do a google search on the topic to confirm. Have you tried downloading the file once you upload to Amazon and trying it on your Kindle? If it works there, then you’re okay. Otherwise, I don’t have any suggestions. Sorry.
Finally, someone who speaks my language. I thank you 100 times.
You’re welcome. I’m glad to be of help. Good luck with your project.
Don’t want to disappoint you, but that won’t be enough. Sadly. That’s the way I did it. In fact it is descripted in Smashwords Style Guide.
This kind of TOC while it provides clickable links it is NOT working with the five point joystick on the Kindle device. (That square button in the middle of the under side of the device.) And Amazon demands that it does just that. Insane, as it is never used when reading novels.
When you click the outer middle button on the right side you usually can navigate just with this one button through all of the chapter beginnings. I found that function by default, as I NEVER use it when reading novels.
But having had a bestseller (destroyed shortly by a troll …) someone sent a note to Amazon that it doesn’t work with this button. So Amazon sent me an eMail regarding this quality problem. Now I’m tearing my hair how to fix this without delving deeply into HTML. 😦
Sorry for the bad English, but I’m German and upset and confused at the moment.
Hadn’t heard about this problem before. Glad to see you eventually solved it. Best of luck.
Thank you so much for these instructions! It’s perfect now and works perfectly when I preview it on Kindle.
I’m glad I was able to help. Best of luck with your book.
Thanks very much for the tip. I found that if you bookmark all the chapters in one go and hyperlink later, you can save time and the process becomes less of a bore. One question: for some unknown reason the hyperlinks I get, although perfectly functional, are orange in color, which is not precisely the way I want them to be. Do you have any idea what could be causing this? Anyway, a great solution to a distressing problem.
Sorry it took me so long to get back to you. I have no idea what would be causing your problem. I hope you’ve solved it.
I did. Just a Kindle preview glitch. Great tip. Thank you.
Excellent post. You should do more of this stuff. I’ve been struggling for weeks trying to comprehend how to turn my short stories into book marks.
Thanks. I’m glad the post was helpful. Good luck with your book.
good stuff!!!
Thanks!
Thanks!
Glad I was able to help. Good luck with your book.
Thank you. Seriously. You have no idea…
Happy to be of help. Good luck with your book.
You saved me, thank you.
Glad it was helpful. Best of luck!
Just wondering, why do you say not to use the automatic TOC generating tool in Word? I used it and it works perfectly well, including in the Kindle previewer. Is it because it limits all your chapter headings to the same font style?
When I wrote this post, the automatic TOC generator didn’t work so well and wasn’t compatible with what Amazon wanted. I’m glad to hear it works better now. Thanks for reaching out!